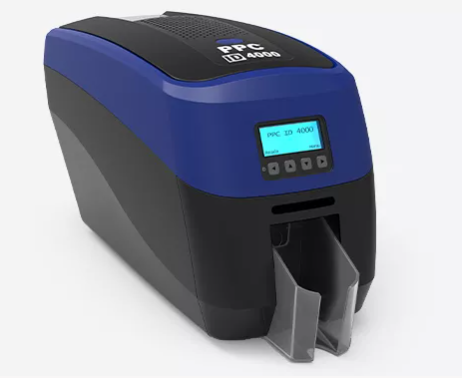
 So you finally went and did it. You bought an ID card printer for your company. Congratulations! You probably took it out of its box, turned it on, and felt that sweet glow of accomplishment… go right out the window, as reality set in. Yes, that’s right. You’re the one who has to now figure this thing out!
Getting Started
Ok… first of all, you can’t just plug it in and press a button. Just like the heroes of old, you’re going to have to face a few obstacles first, and that may cause you to feel a bit overwhelmed. Here are the big ones:
- You’ve got the setup process – Where does everything go, and how does it connect to your computer?
- You’ve got software to install – What do you do if you’re not tech savvy?

- You’ve got materials to deal with – How do you load the cards and the ink ribbons? How do you know if everything is aligned properly?
It’s a lot to take in, especially if this is your first time handling this kind of equipment. Not to worry. We’ll figure this out together.
A Step-by-Step Guide to Using Your ID Card Printer
Let’s break this down, you office hero, you, and we’ll overcome these obstacles one by one:
- Set Up the Printer:
- Find the right spot:
- It needs to be on a stable, flat surface with enough space around it for ventilation and easy access.
- Connect the power cable and switch it on.
- Connect it to your computer.
- This will either be via a provided USB cable or a wireless connection. Check the manual for instructions
- It needs to be on a stable, flat surface with enough space around it for ventilation and easy access.
- Find the right spot:
- Install the Software: This software is essential as it allows your computer to communicate with the printer.
- If there’s a CD, insert it into your computer, or you can download the software from the manufacturer’s website.
- Follow the on-screen installation instructions.
- You should now see your printer listed as a device on your computer.
- Load Cards and Ink Ribbons: This part can be a bit fiddly, but take your time. We’ll get through this together!
- Open the card hopper and load your blank cards.
- Make sure they’re properly aligned and not sticking together.
- Install the ink ribbon or cartridge
- Just follow the instructions in the manual. They usually click into place pretty easily, but you’ll need to make sure everything is secure before you start printing.
- Install the ink ribbon or cartridge
- Make sure they’re properly aligned and not sticking together.
- Open the card hopper and load your blank cards.
- Align and Print Your First Card:
- Open the software and design your card.
- You can usually just select a template
- Add your company logo, text, and photos.
- You can usually just select a template
- Open the software and design your card.
- Before you print, use the software’s alignment tool to make sure everything is positioned correctly.
- When you’re happy with the design, hit Print and watch the magic happen! Your glorious new machine should spring to life, and out will pop your first professionally printed card.
- Strut triumphantly through the office, showing off the new card, and bask in the glory of becoming the new office hero.
Printing Your IDs with Confidence
So now you should feel pretty confident when using your ID card printer. You’ve set it up, installed the software, loaded your materials, and printed your first card. The process might have seemed daunting at first, but with a bit of patience and careful attention to detail, you are now a master. Thanks to you, your business can produce ID cards whenever they’re needed, which will keep your operations running smoothly and securely. Nice work!